How Do I Candle a Chicken Egg in 10 Simple Steps
To candle a chicken egg in 10 simple steps, you need to gather a bright LED flashlight and find a dark room.
It’s essential to wash your hands thoroughly before you begin to ensure cleanliness.
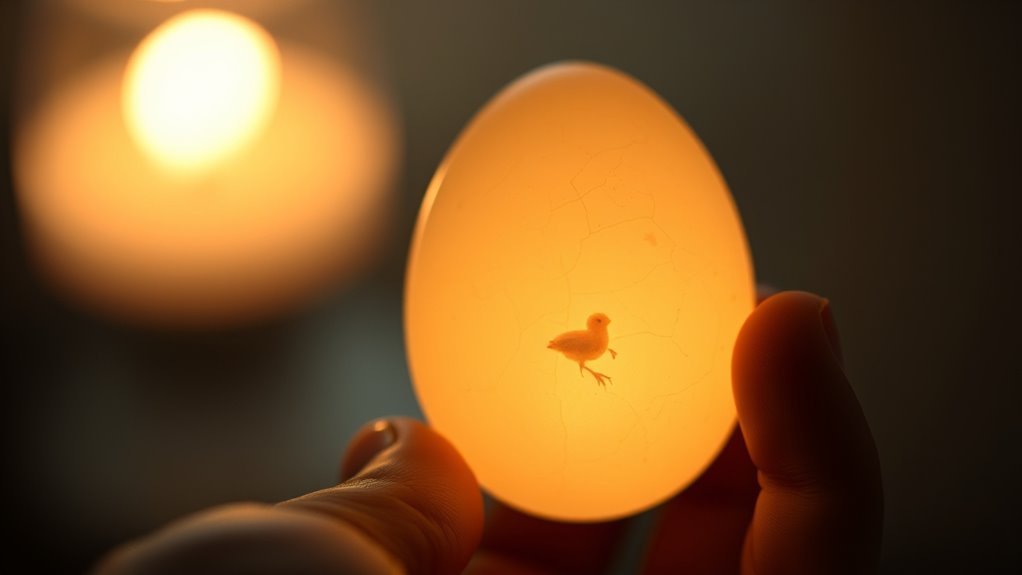
Next, gently hold the egg with the narrow end facing the light.
Shine the light through the egg and slowly rotate it. This will help you see clear or dark areas inside.
As you examine the egg, look for red veins indicating embryo growth.
To keep track of your progress, number the eggs.
Remember to handle them swiftly and return them to the incubator promptly.
Keep practicing to learn how to spot fertility and assess embryo health.
With time and experience, you’ll become more skilled at candling eggs effectively!
Happy candling!
Gather the Right Equipment for Candling

Before you begin candling, gather the right equipment to guarantee clear visibility and safety.
Gather proper equipment first to ensure clear visibility and safe candling.
You’ll need a small, bright LED flashlight or a specialized egg candler with adjustable brightness to see the internal structures clearly. A focused beam is essential so the light evenly shines through the egg without overheating it.
Prepare a clean, soft surface or an egg carton to hold your eggs securely during candling. This setup helps you examine the air cell and other details inside the egg without risking damage.
Adjust the flashlight’s intensity and angle to get the best view of the embryo development and veins. Having the right tools ensures you can confidently inspect eggs and monitor their progress effectively.
Choose a Dark Room With Minimal Light

When you choose a dark room with minimal light, you’ll maximize your ability to see inside the egg clearly during candling.
Find a completely dark room where you can turn off all lights and cover any windows to block outside light.
This eliminates distractions and guarantees the bright beam from your flashlight or egg candler penetrates the shell effectively.
In this dark environment, you’ll better observe the egg’s internal structures, spotting development or any issues.
Make sure the room’s temperature is stable to avoid disturbing the egg’s condition.
Candling in a quiet, dark room helps you focus and get accurate results.
Always remember, the less ambient light there is, the clearer and more detailed your observations during candling will be.
Wash Your Hands Thoroughly Before Handling Eggs

To protect the delicate embryo inside, you should always wash your hands thoroughly with soap and warm water before handling eggs.
Proper handwashing removes bacteria and oils that could cause contamination on the eggshell, risking infection during incubation.
Cleanliness is essential to maintain a safe environment for the embryo’s development.
After washing, dry your hands completely with a clean towel or paper towel. This helps prevent slipping and ensures gentle handling.
Avoid touching the eggs with dirty or greasy hands, as this can transfer harmful bacteria to the eggshell.
This reduces the chances of successful incubation.
Hold the Egg Gently and Position It Correctly
Although candling requires steady hands, it’s important to hold the egg gently to avoid cracking its delicate shell.
Gently hold the egg with your fingertips, applying just enough pressure to keep it secure without squeezing.
Position the egg upright with the small end facing downward; this keeps the air cell at the top, making internal development easier to observe.
Align the egg at a slight angle toward your light source so you can see inside clearly.
Use your other hand or a soft surface to support the egg and prevent slipping.
Keeping a steady hand during candling is essential—any movement can blur your view of the internal development.
Shine the Light Through the Narrow End of the Egg
Once you’ve secured the egg and positioned it properly, the next step is to shine a bright light through the narrow end.
Hold the egg with the narrow end facing upward and gently place it against your light source.
Make sure the light is strong enough to penetrate the shell so you can clearly see inside.
It’s best to candle the egg in a dark room to improve visibility.
As you shine the light through the narrow end, you’ll notice the air sac and may glimpse the embryo if it has started developing.
Gently rotate the egg to observe any changes without applying pressure that could damage the shell or embryo.
This careful shining helps you assess the egg’s internal condition effectively.
Look for Signs of Fertility and Embryo Development
When you candle the egg after several days, you’ll want to look closely for red blood vessels branching out from a small dark spot near the yolk center—this indicates a developing embryo and confirms fertility.
These red veins are early signs of embryo development, showing that the fertile egg is progressing well.
As you continue candling chicken eggs, watch for a clear, translucent air sac at the larger end, which signals proper growth.
Internal blood vessels spread across the yolk, forming a network that’s easy to spot with a bright light.
If you don’t see these red veins or movement inside, the egg may not be fertile or the embryo might’ve stopped developing.
Recognizing these signs helps you determine which eggs are viable during incubation.
Identify Clear, Cloudy, or Darkened Areas Inside the Egg
As you candle your chicken eggs, pay close attention to the clear, cloudy, or darkened areas inside.
These variations tell you a lot about the embryo’s status.
These variations reveal important clues about the embryo’s health and development stage inside the egg.
A clear area usually means no embryo development, indicating infertility or early death.
Cloudy areas suggest the embryo is developing, with visible veins spreading through the translucent region.
Darkened patches often indicate a viable embryo, especially if you spot movement or a heartbeat.
Here’s what to look for:
- Clear area: no embryo, likely infertile or early death
- Cloudy: translucent with veins, embryo growing
- Darkened: opaque with possible movement, viable embryo
- Uniformly dark: advanced or near-hatching embryo
Recognizing these helps you know which eggs are healthy or need removal.
Rotate the Egg to Get the Best Viewing Angle
Although candling provides a view inside the egg, you’ll get the clearest picture by gently rotating it against the light to find the best angle.
As you rotate the egg slowly, you’ll uncover different perspectives that might reveal the embryo hidden behind the shell or air cell.
Make sure to handle the egg gently, turning it in small increments to avoid disturbing the developing embryo or damaging the shell.
Rotating during candling lets you observe consistent signs of growth, like blood vessels or movement, from multiple viewing angles.
Record Observations and Number the Eggs for Tracking
To keep track of each egg’s development, start by gently numbering them with a soft pencil before incubation begins.
This egg numbering lets you easily identify each egg during candling and guarantees accurate tracking of development.
When you candle your eggs, record observations carefully in a candling log.
Focus on these key points for effective incubation monitoring:
- Number eggs softly to avoid shell damage or contamination.
- Note embryo movement, vein patterns, or any abnormalities.
- Maintain a detailed chart with egg number, candling date, and status.
- Use your records to compare progress and spot non-viable eggs.
Handle Eggs Quickly and Return Them to Incubator Promptly
After numbering and carefully recording your eggs, you’ll want to handle them with care during candling to protect the developing embryos.
Always handle eggs gently to avoid damaging their fragile shells or harming the embryos inside.
Limit the time you spend candling by using a soft light source in a dark room. This helps you see more clearly and work faster.
It’s essential to return eggs promptly to the incubator to maintain stable temperature and humidity levels, which are critical for development.
When you inspect an egg, place it back in its original position quickly and carefully.
Also, make sure your hands or gloves are clean to prevent contamination.
Frequently Asked Questions
How to Properly Candle a Chicken Egg?
You gently hold the egg against a bright light in a dark room, turning it slowly to see blood vessels and embryo movement.
This helps you check fertility and development before carefully returning it to the incubator.
What Can I Use to Candle a Chicken Egg?
You can use a bright LED flashlight, a small egg candler, or even your smartphone’s flashlight in a dark room.
Just make sure the light is strong and focused to see the egg’s interior clearly.
When to Start Candling Chicken Eggs?
Think of candling like turning on a flashlight in a dark cave—you should start around Day 7 to see early embryo signs.
Waiting until Day 7-10 helps you spot non-viable eggs without stressing them too soon.
How to Incubate Chicken Eggs Step by Step?
You’ll keep eggs at 99.5°F with 50-55% humidity for 18 days.
During this period, make sure to turn them 3-5 times daily.
Then, increase humidity to 65-70% and stop turning during the last three days before hatching.
Good luck with your incubation!
Conclusion
Now that you know how to candle a chicken egg in just 10 simple steps, you’re ready to keep a close eye on your eggs’ progress without breaking a sweat.
Remember, practice makes perfect, so don’t get discouraged if it feels tricky at first.
Handle each egg gently and trust your observations to guide you.
Before you know it, you’ll be spotting healthy embryos like a pro, and hatching success will be right up your alley!
In conclusion, mastering the art of candling chicken eggs is an exciting journey.
With patience and practice, you’ll become skilled at identifying embryo development.
So, keep experimenting, and soon, you’ll be well on your way to achieving hatching success!